Azure DevOps
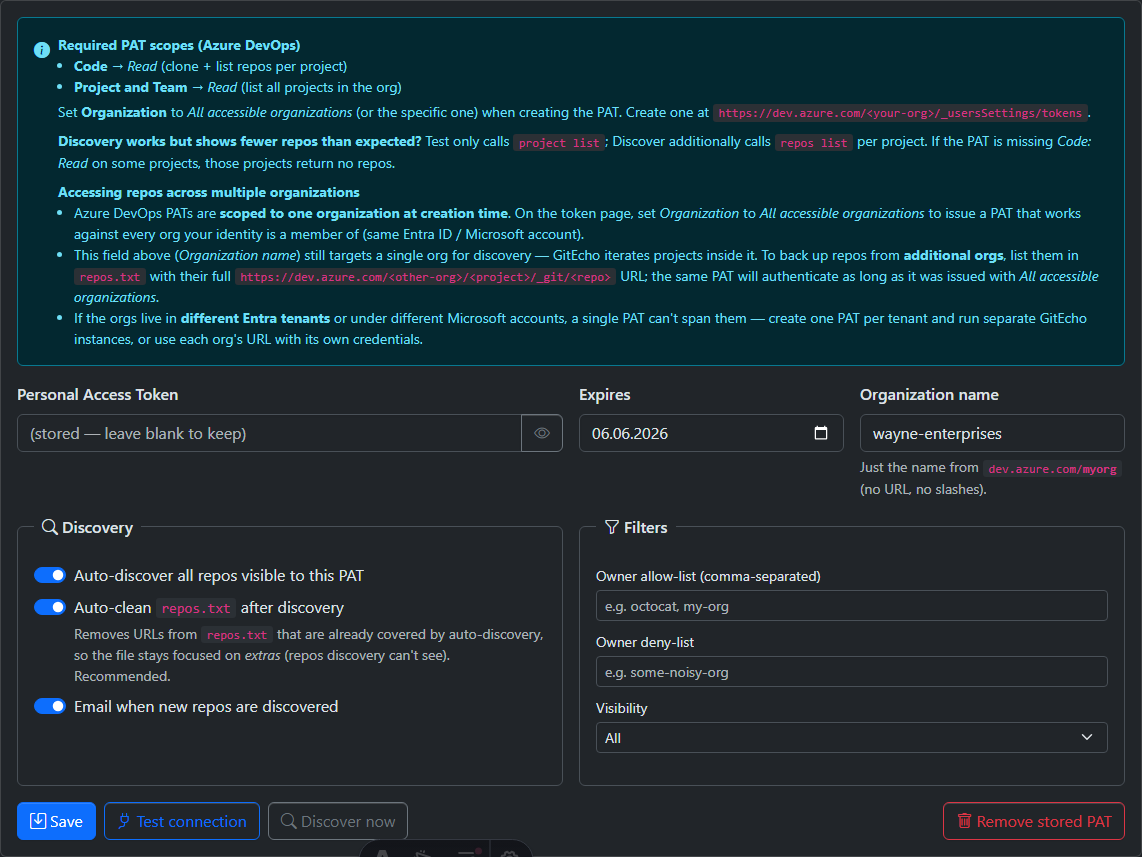
Creating the Token
GitEcho authenticates to Azure DevOps with a Personal Access Token (PAT).
- Go to
https://dev.azure.com/<your-org>/_usersSettings/tokens(or User settings → Personal access tokens). - Click New Token, give it a name (e.g.
gitecho-backup) and an expiration date. - Set Organization to All accessible organizations (or the specific org).
- Under Scopes, choose Custom defined and grant:
- Code → Read (clone and list Git repos; also covers reading TFVC items and changesets)
- Project and Team → Read (list all projects in the org)
- Click Create and copy the value (shown only once).
- Paste it into Settings → Providers → Azure DevOps in GitEcho, set the organization name, and click Test connection.
Required PAT Scopes
- Code → Read (clone and list Git repos; also covers reading TFVC items and changesets)
- Project and Team → Read (list all projects in the org)
Set Organization to All accessible organizations (or the specific one) when creating the PAT.
Create at: https://dev.azure.com/<your-org>/_usersSettings/tokens
Multiple Organizations
Azure DevOps PATs are scoped to one organization at creation time. To back up repos from additional orgs:
- List them in
repos.txtwith their full URL: - The same PAT authenticates as long as it was issued with All accessible organizations
Cross-tenant limitation
If the orgs live in different Entra tenants, create one PAT per tenant and run separate GitEcho instances.
Auto-Discovery
The Azure DevOps provider discovers all repositories via az devops project list + az repos list and merges them with repos.txt entries.
Both Git and TFVC (Team Foundation Version Control) sources are supported. During discovery, GitEcho reads each project's sourceControlType capability (Git or Tfvc) and probes for TFVC content when any of these hold:
- the project's source-control type is Tfvc (catches TFVC projects even when they also contain Git repos), or
- the project has no Git repositories at all, or
AZUREDEVOPS_TFVC_DISCOVER_ALL=trueis set (forces a probe of every project).
When TFVC content is found, the project is registered as a TFVC root. You can also pin a TFVC source explicitly in repos.txt (see below). Set LOG_LEVEL=debug to see, per project, the detected source-control type, whether a probe ran, and why.
Discovery can be disabled per provider via the Auto-discover checkbox on Settings → Providers.
TFVC Support
TFVC sources are backed up as latest-state snapshots: GitEcho exports the current contents of a server path as a .zip into backup storage. This is a point-in-time content backup — it does not capture file history versions, labels, or branch structure. The changeset id of the latest export is recorded as the snapshot's revision, the changeset history that produced the snapshot is captured as metadata, and unchanged paths are skipped on subsequent runs.
How TFVC backup works
Because the official TFVC CLI (tf.exe) is Windows/Visual Studio bound, GitEcho talks to the Azure DevOps REST API instead, which works headless in a Linux container with just a PAT:
- Discover — for each project, GitEcho reads the
sourceControlTypecapability and checks for TFVC content via_apis/tfvc/items. A project is probed when its type is Tfvc, when it has no Git repos, or whenAZUREDEVOPS_TFVC_DISCOVER_ALL=trueforces a probe of every project. - Check the latest changeset — it reads the most recent changeset id from
_apis/tfvc/changesets. If it matches the last successful snapshot's recorded revision, the export is skipped (nothing changed). - Export — otherwise it downloads the current contents of the server path through
_apis/tfvc/itemsand writes them into a.zipunder<provider>/<owner>/<name>/snapshots/. - Capture changeset metadata — it records the changesets between the last successful snapshot's revision and the current latest changeset (id, author, comment, date) as JSON on the backup item, so you can see what changed without opening the archive.
- Record — the snapshot's changeset id is stored as
source_revisionand the entry is markedartifact_kind = snapshotwithvcs_type = tfvc, so the UI and APIs distinguish it from Git mirrors.
TFVC snapshots are always produced this way regardless of the configured BACKUP_MODE (which only governs Git repositories).
Pinning a TFVC source
TFVC sources use a GitEcho-internal identifier instead of a clone URL:
Add one to repos.txt to back up a specific TFVC path (the $/... server path is URL-encoded automatically when discovered; when adding manually, a plain $/Project/Main path is accepted):
Snapshots are browsable from the repository's Snapshots action in the web UI. Over time these accumulate — enable snapshot retention to prune old TFVC snapshots automatically.
Restoring a TFVC snapshot
A TFVC snapshot is a self-contained .zip of the server path's contents at a point in time — there is no GitEcho-side "restore" button; you recover by extracting the archive:
- Open the repository's Snapshots action in the web UI and Download the snapshot you want (the run detail page shows each snapshot's changeset id under
revisionalong with the captured changeset history, so you can pick a specific point in time). - Extract the
.zip. The result is the full contents of the server path (for example$/PaymentsApp/Main) as of that snapshot's changeset. - Use the files directly, or to return them to TFVC: create a TFVC workspace mapped to the target server path, copy the extracted files in, and check in the changes.
Note
A snapshot captures content only plus changeset metadata — not the prior file versions, labels, or branch structure. Checking an extracted snapshot back into TFVC creates a single new changeset rather than replaying the original history. For point-in-time content recovery this is sufficient; full history mirroring is out of scope (see the roadmap).
For the full design (changeset-metadata capture and run-detail/restore UX), see TFVC Support.
Configuration
Configure via Settings → Providers → Azure DevOps:
- Enter your PAT
- Set the organization name (if not using auto-discovery from repos.txt)
- Set the expiration date
- Click Test connection to verify
- Optionally configure discovery filters